
By Max Milano (Tech Writer)
Every PPC Campaign Must Start With a Single Question: Can you actually track conversions correctly?
Before you ever launch a PPC campaign, before you settle with a designer about whether a dark background on a landing page converts better than white, this is the one basic, brutal question you must answer honestly, but the reality is that most advertisers cannot, because their conversion tracking is on shaky ground (if they even bothered to set it up properly in the first place).
What this means is that a large percentage of advertisers are strolling into the digital battlefield with scripts scattered across plugins, pixels installed in triplicate, and data layers tied together with duct tape. Their conversions fire when they shouldn’t, don’t fire when they should, and half the time, nobody knows where the leads come from. Then Meta takes the credit. Or Google does. Or neither. It all becomes smoke and fog.

But it doesn’t have to be that way. When your tracking is clean, simple, and unified, something remarkable happens. You finally see the truth behind the clicks. You understand what works, what doesn’t, and where your money is going. You gain control.
What you need is a clean, professional foundation that combines WordPress (to run your main site on), plus Google Tag Manager (GTM), the Meta Pixel, plus Google Ads conversion tags, but all set up inside one container, with one workflow, and zero confusion.
How To Install Google Tag Manager on WordPress (The Right Way, Not the “200 Plugins Later” Way)
The beginning of great tracking is Google Tag Manager (GTM). It becomes the central brain where all pixels and tags live. So, instead of pasting code into headers or scattering snippets across plugins, GTM brings everything into one place. This matters more now than ever, because some websites can become a jungle of conflicting themes, caching layers, builders, and optimization plugins that break tracking without warning.
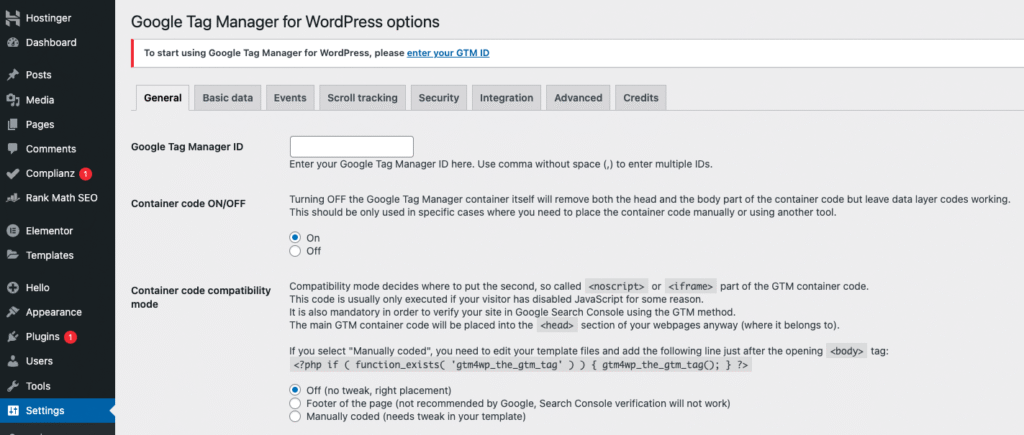
This is why we recommend installing Google Tag Manager (GTM) using the plugin that serious marketers trust: Google Tag Manager for WordPress (by Thomas Geiger). It’s lightweight, reliably updated, and handles GTM script placement with the precision you want.
Many WordPress users also install Google Site Kit, Google’s official plugin for managing Search Console, Analytics, AdSense, and PageSpeed Insights. It’s helpful for beginners who want a quick way to verify their site and see basic SEO metrics inside WordPress.
But for Google Tag Manager, you still want the precision and control of Google Tag Manager for WordPress (by Thomas Geiger). It places the GTM container exactly where it needs to be and supports more advanced tracking setups like Meta Pixel, Google Ads conversions, and future server-side tagging.
Once you’re inside WordPress, go to the Plugins section and search for Google Tag Manager for WordPress (by Thomas Geiger). After installation, head to Settings: Google Tag Manager and drop in your container ID. Save the changes and breathe, you’ve already done more than most advertisers do in a year.
Installing The Meta Pixel Inside Google Tag Manager
Once the Google Tag Manager plugin is installed on WordPress, your website is now “listening” for a GTM container. The next step is to go inside Google Tag Manager, not WordPress and actually create the pixel tag that will fire on your site.
Think of WordPress as the house, and GTM as the electrical panel. Installing the plugin connects your house to the panel. Now you need to install the circuits.
Here’s how it works, step by step.
1. Go to your Google Tag Manager account
You’ll see your container, the same container ID you added inside WordPress.
Open it.
What you’re about to do is tell GTM: “Fire the Meta Pixel on every page of my website.”
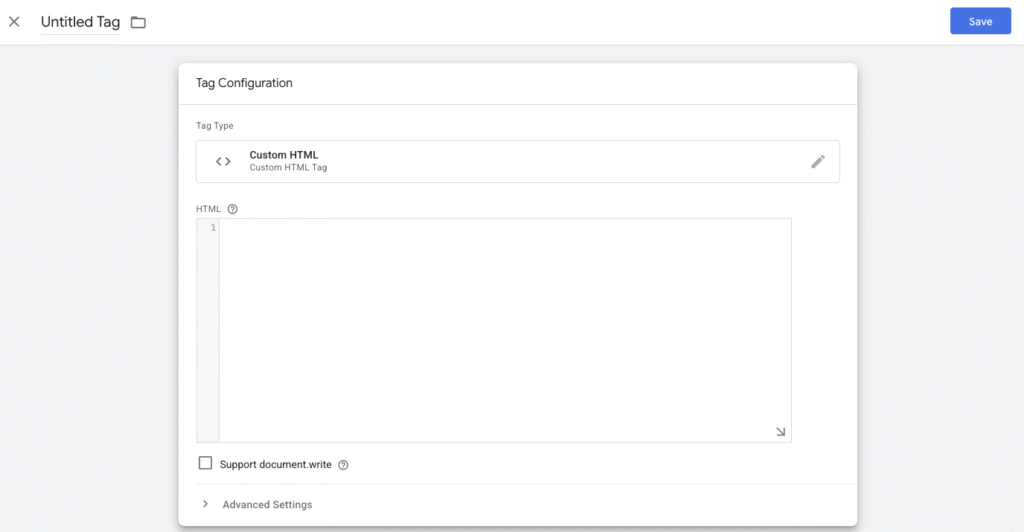
2. Create a new Tag
Inside GTM, click:
Tags: New: Tag Configuration: Custom HTML
Why Custom HTML?
Because Meta gives you a block of JavaScript (the Pixel base code) and GTM needs a place to run it. Custom HTML is that place.
3. Paste the Meta Pixel code inside the tag
You get this code from your Meta Events Manager:
Events Manager: Your Data Source: Install Code Manually
Meta will show you a block of JavaScript beginning with:
Copy that entire script.
Paste it into the Custom HTML box inside GTM.
That’s the Pixel. That tiny script is what tracks PageViews and powers every future event you’ll configure.
4. Name the tag something clean and obvious
Avoid cryptic names. Avoid version numbers. Avoid overthinking it.
Use something like:
“Meta – Base Pixel”
You’ll thank yourself later.
5. Set the Trigger to “All Pages”
This tells GTM:
“Fire the Meta Pixel every time someone loads a page on my site.”
This is essential, because the base pixel must fire universally before you can track anything else: leads, purchases, signups, button clicks.
To do this:
Triggering: All Pages
Done.
6. Save and publish your GTM container
Nothing goes live until you hit:
Submit & Publish
Once published, your Pixel is officially running on every page of your website, cleanly, correctly, without touching your WordPress theme or header code.
Why This Matters:
With GTM, the Pixel sits in one predictable location. You control it. You test it. You fix it. You scale it.
This is the foundation every serious PPC account needs.
This step alone removes 90% of the chaos I see in PPC audits.
Installing Google Ads Conversion Tracking Tags
Google Ads conversions are the beating heart of performance. When Google knows what to optimize for, campaigns hit their stride. When conversions break, your cost per acquisition explodes. I cannot count how many times I’ve seen campaigns burn thousands simply because conversion tracking was installed incorrectly.
Installing Google Ads Conversion Tracking Inside GTM
Once your Meta Pixel is firing, the next step is giving Google Ads the one thing it can’t live without: real conversion data. Google will optimize for whatever you tell it to, but if the conversion tracking isn’t installed correctly, Google is flying blind. So let’s give it clean, accurate signals.
Everything starts inside your Google Ads account. Open it, go to the top menu, and click:
Tools & Settings: Conversions
Here you will either create a new conversion (for leads, purchases, signup completions, etc.) or select one you’ve already made. When Google asks how you want to install the conversion tag, choose the setup method:
“Use Google Tag Manager.”
Google will then show you two short pieces of information:
- Conversion ID
- Conversion Label
You don’t need any code. You don’t need to paste JavaScript anywhere. Just these two values. They are the entire conversion tag.
Now go back into Google Tag Manager.
Inside GTM, click:
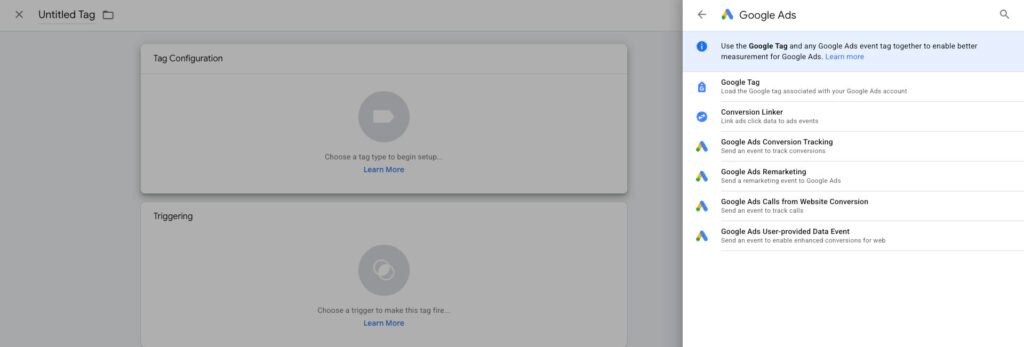
Tags: New: Tag Configuration: Google Ads Conversion Tracking
You’ll see two fields that match what Google just gave you: one for the Conversion ID and one for the Conversion Label. Paste each value into its matching field. GTM handles the rest.
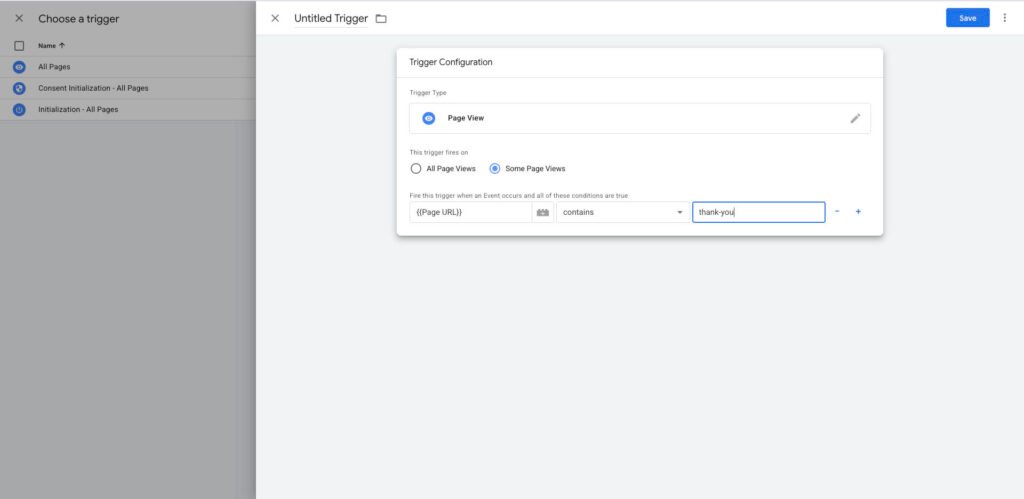
At this point, the only thing left to decide is when the conversion should fire.
If your website uses a clear, separate thank-you page, something like:
yourwebsite.com/thank-you
Then life is simple. You create a trigger in GTM that fires when the page URL contains “thank-you.”
Once you’ve added the trigger, save the tag, publish your GTM container, and your Google Ads account will now receive clean conversion signals. This is when campaigns begin to wake up, when Google finally knows what “success” looks like on your website.
Google can’t optimize what it can’t see. This setup gives it eyes.
Publishing the Container (The Step Everyone Forgets)
Nothing goes live in GTM until it’s published. You can build beautiful tags, perfect triggers, and airtight configuration, but until you hit Submit: Publish, your visitors will never see a single pixel.
Once you publish, name the version, something easy to remember, like “Initial Tracking Setup.” This makes debugging easier later.
Testing the Setup Like a Professional
Once your tags are installed, you’re not done. Not even close. Great tracking doesn’t depend on hope, it depends on verification. This is the part that separates amateurs from professionals. A professional doesn’t “assume” the pixel is working. A professional checks the instruments the way a pilot checks the cockpit before rolling down the runway.
The first step is to use Google Tag Manager’s Preview Mode.
Click Preview, enter your website URL, and let GTM load your site in its diagnostic window. As you click through your pages, you’ll see every tag that fires in real time. If your Meta Pixel loads correctly, GTM will show it instantly. If your Google Ads conversion tag fires somewhere it shouldn’t (or doesn’t fire at all) GTM will reveal that too. No guessing. Just real conversion data.
Then you cross-check your work inside Meta. Open Meta Events Manager, go to the Test Events tab, and reload your website. Meta should show a clean, incoming PageView event seconds later. If it doesn’t appear, something is wrong, and you want to know now, not after spending money on ads.
Finally, confirm your Google Ads setup using Google Tag Assistant. It will tell you if Google’s global tag is present, whether your conversion tag is active, and if the signals are clean.
When all three tools line up: GTM firing events correctly, Meta capturing PageViews, and Google Ads registering conversion signals, you know your tracking is airtight. That’s your go signal. That’s the moment you’re truly ready for liftoff.
Google Tag Manager’s Preview Mode is built directly into the GTM interface. It lets you test your tags in real time, no guessing, no praying, no hoping the Pixel “just works.”
Here’s exactly how to access it:
1. Log in to Google Tag Manager
Go to: https://tagmanager.google.com
Open the container you installed on your WordPress site.
2. Click the “Preview” button at the top right
In the main workspace, you’ll see a button in the upper-right corner labeled: Preview
It sits right beside the “Submit” (Publish) button.
3. Enter your website URL
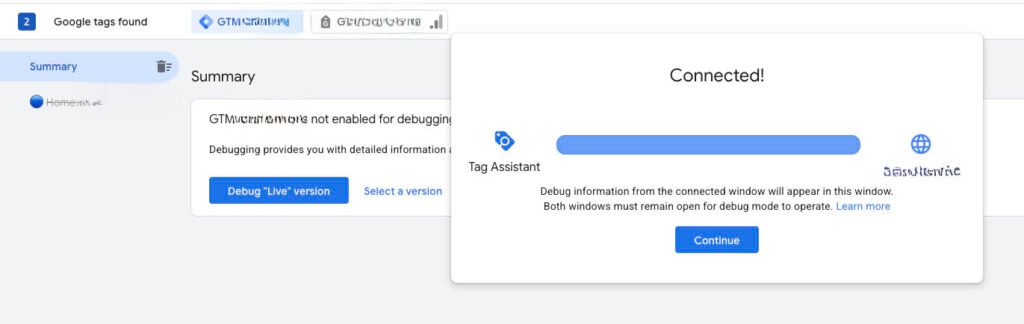
A new window (Tag Assistant) will appear asking for a URL.
Paste your website or landing page.
Then click Connect.
4. Your website opens in debug mode
A new browser window or tab opens showing your website normally, but now GTM is watching behind the scenes.
At the bottom of your screen, you’ll see:
- Pages visited
- Tags that fired
- Tags that didn’t fire
- Event timeline
This is where you verify:
- Meta Pixel: fires on every page
- Google Ads conversion tag: fires only on thank-you page
- GA4: fires correctly if installed
Why This Workflow Beats the Old “Paste Scripts Everywhere” Era
This setup is clean. It’s fast. And it lets you build into the future. GA4, Meta CAPI, Google Ads Enhanced Conversions, server-side tracking, everything hinges on GTM. One dashboard. One source of truth. One clean stack.
Once you embrace GTM, your website becomes easier to scale, easier to audit, and infinitely easier to optimize.
This is the base of a high-performance PPC machine.
Need Us To Setup Your Google Tag Manager?
Clean tracking is the foundation of profitable PPC. If you want us to install GTM, Meta Pixel, Google Ads tags, GA4, or even server-side tracking, without breaking anything, we can do it for you professionally and fast. Contact us today.